Day one of geofenced attendance. By 9:30 AM, six supervisors have called: the app says they're outside the site, but they're standing at the gate. Meanwhile, at another site, someone has worked out that they can punch in from the bus stop across the road. Both problems have the same cause: the geofence radius.
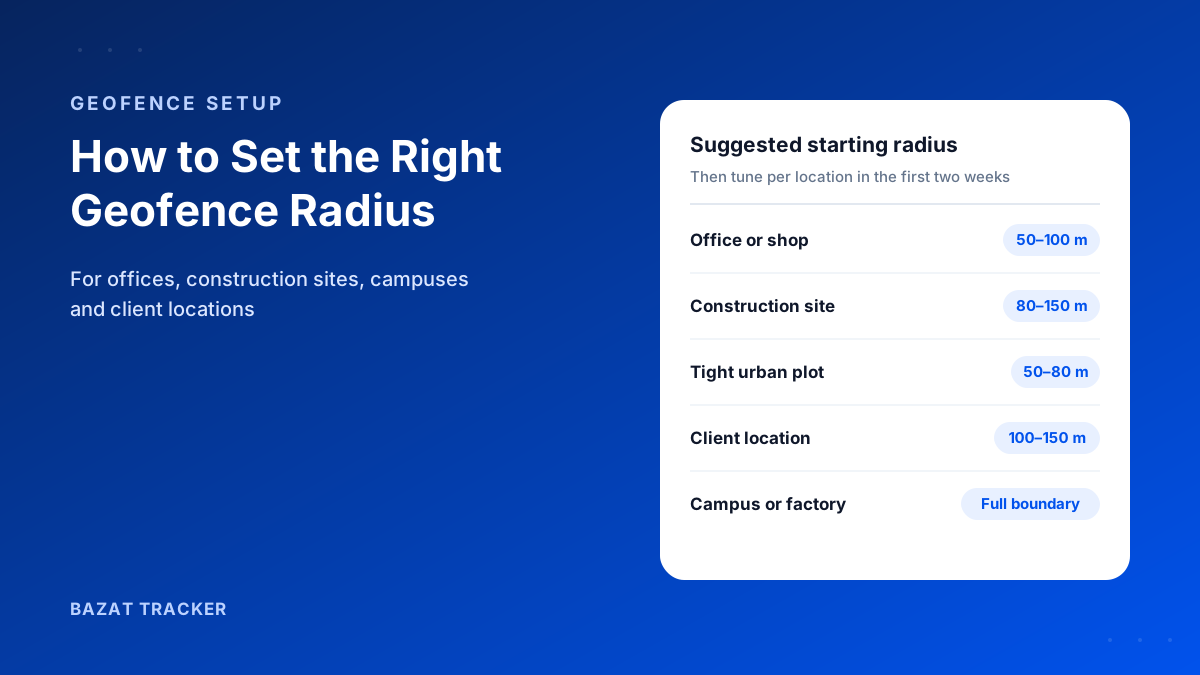
A geofence radius is the distance around a location within which a punch-in is accepted. As a starting point, use about 50–100 m for an office or shop, 80–150 m for most construction sites (50–80 m on tight urban plots), and a radius that covers the whole campus for a tech park or factory. Then adjust per location: widen it if genuine punches fail because of weak GPS, and tighten it if people can punch in from outside the premises.
Why the Radius Matters
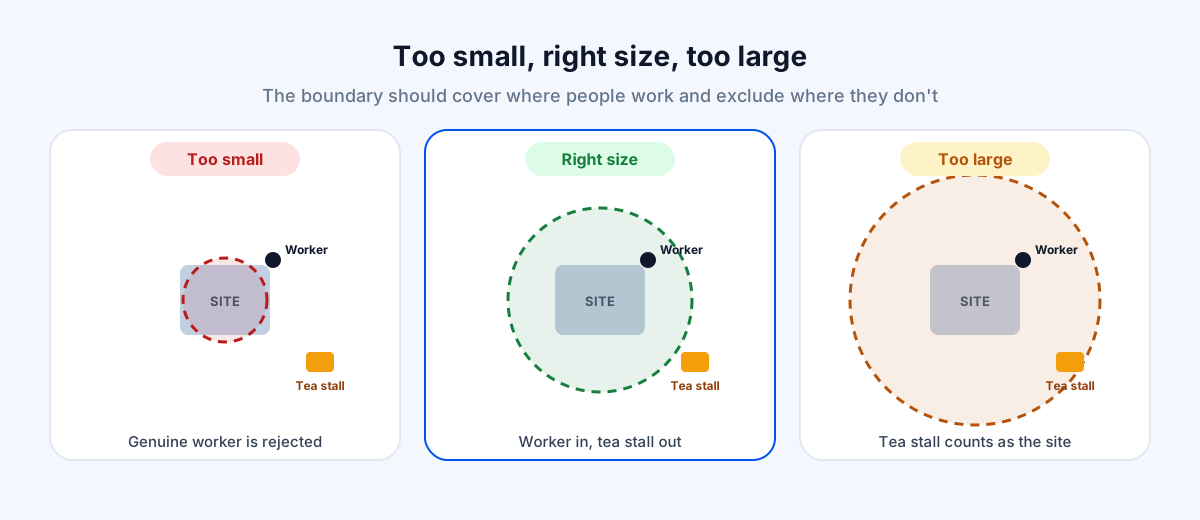
A geofence only proves location if its boundary matches the real premises. Phone GPS isn't perfectly precise: outdoors it's usually accurate to a few metres, but indoors, in basements, between tall buildings and on upper floors it can drift by much more. The radius has to absorb that drift without letting in places that aren't your site.
Get it wrong in either direction and the system loses trust.
Two ways it fails
- 1Too small: genuine punches are rejected, staff get frustrated, and managers start approving manual exceptions, which defeats the purpose.
- 2Too large: nearby places (a tea stall, a parking lot, the next building, home if it's close) count as the site.
Starting Radius by Location Type
Suggested Starting Radius
| Location type | Starting radius and notes | |
|---|---|---|
| Small office or shop | Location typeSingle building, street-facing | Starting radius and notesAbout 50–100 m; tighter in dense markets |
| Construction site | Location typeOpen plot, building under construction | Starting radius and notesAbout 80–150 m; 50–80 m on tight urban plots |
| Large layout or villa project | Location typeSpread-out plots and roads | Starting radius and notesCover the full layout, or split it into several geofences |
| Tech park or factory campus | Location typeSeveral buildings, gated | Starting radius and notesCover the campus boundary; GPS drifts indoors |
| Client location for visits | Location typeOffice, shop or home | Starting radius and notesAbout 100–150 m, so a check-in from the parking area counts |
These are starting points, not rules. Every location is different: what matters is that the boundary covers where your people genuinely work and excludes where they don't.
Long, Irregular and Linear Sites
Not every site is a neat circle.
A circle works well for a compact office or plot. It works badly for a long warehouse, an L-shaped campus or a villa layout spread along several roads. Make one circle big enough to cover the whole thing and it also takes in half the neighbourhood.
What to do instead
- 1Split a large or odd-shaped site into several smaller geofences, each sized to one part of it.
- 2For linear projects such as roads, pipelines or metro packages, place geofences along the stretch where work is actually happening, and move them as the work moves.
- 3For multi-building campuses, decide whether attendance should count anywhere on campus or only at a specific building, and size the boundary to match.
- 4Assign people to the geofences they actually work in, so a punch at the wrong block is visible.
Attendance Geofence vs Client Visit Geofence
The same tool serves two different jobs, and the radius should reflect that. An attendance geofence answers “did they start work at the right place?” and should be fairly tight. A client visit geofence answers “did they really go to the client?” and can be a little more generous, because field staff often park outside, wait in a reception or meet in a nearby branch.
For visits, time spent inside the geofence is often a better signal than the exact radius. A two-minute stay is worth a question, whatever the boundary size.
How to Tune It in the First Two Weeks
A practical process
- 1Draw the geofence on the map around the actual premises, not just a pin at the main gate.
- 2Have a supervisor do a test punch from the farthest genuine work spot: the basement, the top floor, the back of the plot.
- 3Have someone test from the nearest place that should not count: the tea stall, the bus stop, the next building.
- 4Adjust until the first test passes and the second fails.
- 5In the first two weeks, review rejected punches daily. Clusters of failures at one site mean the radius is too tight there.
- 6Re-check whenever a site changes: a new block, a new floor, or the project moving into the basement stage.
Basements, Upper Floors and No Network
Construction sites in the basement stage and offices on high floors are where GPS is weakest. Two things help: an app that filters out obviously wrong GPS readings instead of rejecting the punch outright, and offline capture, so a punch made without network is stored and synced when the phone reconnects.
If a site regularly fails, it's often better to route borderline punches to a supervisor for approval than to keep widening the radius until it covers the whole street.
Common Geofence Radius Mistakes
Avoid these
- 1Placing the pin at the main gate instead of the centre of the premises, so half the site sits outside the boundary.
- 2Using one radius for every location because it's quicker to set up.
- 3Widening the radius every time someone complains, until it covers the whole street.
- 4Never revisiting a geofence after a site expands, moves into the basement stage or opens a new block.
- 5Approving every rejected punch manually, which quietly turns the geofence back into an honour system.
A Geofence Alone Isn't Enough
The radius proves where the phone is. It doesn't prove who's holding it.
One employee can carry a colleague's phone into the geofence, and mock-location apps can make a phone report a location inside it from anywhere. That's why geofenced attendance should be combined with a face check with liveness, and with detection of mock-location apps and rooted devices.
Bazat Tracker lets you set a separate geofence and radius for every site, office and client, and combines it with face verification, fake-GPS detection and offline capture, from ₹249 per user per month on yearly billing.